
Managing AWS ECS (Elastic Container Service) directly from the AWS console can quickly become overwhelming. Setting up a cluster involves creating a VPC, subnets, security groups, an Application Load Balancer (ALB), task definitions, and services. Each step requires multiple clicks, and it’s easy to miss something. Need the same setup for staging or production? Then you have to repeat everything manually, often leading to mistakes, inconsistent environments, and wasted time.
Terraform solves this problem by letting you define your infrastructure as code. Instead of manually creating resources in the console, you write them as configuration files. This makes your setup repeatable, consistent, and version-controlled. With a single command, you can deploy or update your entire ECS environment effortlessly.
In this guide, we’ll go step by step on how Terraform can be used to provision a complete ECS Fargate setup on AWS.
Prerequisites
Before we dive in, make sure you have:
- An AWS account.
- AWS CLI installed and configured.
- Terraform installed.
- A Dockerized app (we’ll push it to AWS ECR).
- Basic AWS knowledge (VPC, ECS, IAM).
AWS Architecture
As solution architects, we’ll make our infrastructure decisions with a strong emphasis on scalability, security, and fault tolerance, while taking advantage of AWS-managed services to keep things simple and reliable.
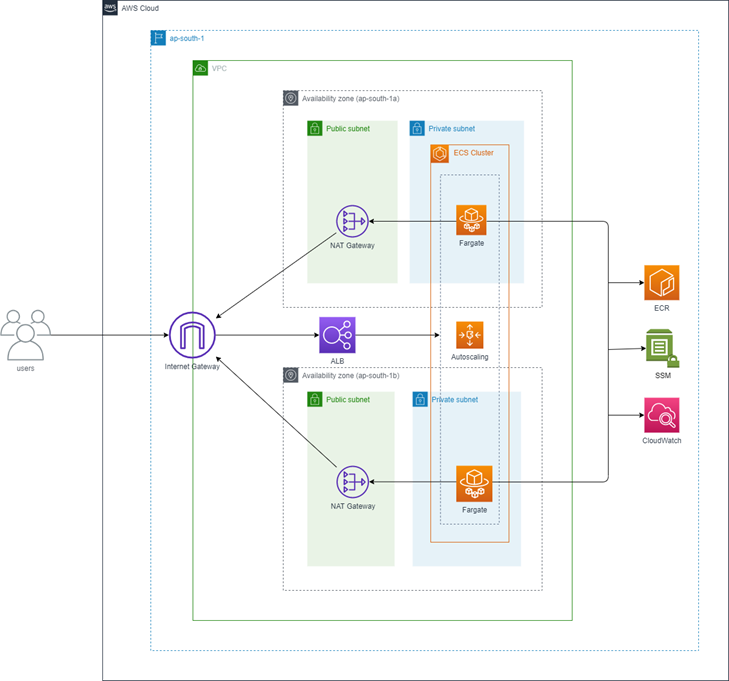
High Availability (HA):
We’ll design the architecture to run across multiple Availability Zones for resilience. Public and private subnets will be provisioned in two different AZs. The ALB will span both public subnets, while ECS Fargate tasks will run inside private subnets in each AZ. This setup ensures high availability and keeps the application running smoothly even if one AZ fails.
Security Considerations:
We’ll keep our security groups as tightly scoped as possible. The ALB will accept inbound HTTP traffic from the internet, but ECS tasks will only accept traffic from the ALB. On top of that, we’ll configure IAM roles with the principle of least privilege — just enough access for ECS task execution, fetching secrets from SSM Parameter Store, and managing autoscaling.
Infrastructure as Code (IaC):
To make sure our setup is consistent and repeatable, we’ll define everything in Terraform. A remote backend with S3 (for storing the state) and DynamoDB (for state locking) will let us manage infrastructure safely as a team.
Logging and Observability:
We’ll aggregate logs in CloudWatch using log groups and streams. This gives us a single place to debug, monitor, and analyze application behavior.
Scalability:
Finally, we’ll set up ECS Auto Scaling policies driven by CloudWatch alarms. The service will automatically adjust task counts based on CPU utilization, helping us balance performance and cost efficiency under different loads.
Step 0: Configure AWS CLI Profile
Before Terraform can provision resources, it needs AWS credentials. Use a named profile to avoid conflicts with other AWS accounts.
Configure your AWS CLI profile:
aws configure --profile PankajYou’ll be prompted for:
- AWS Access Key ID
- AWS Secret Access Key
- Default region (e.g.,
ap-south-1) - Output format (e.g.,
json)
Verify the profile:
aws configure list-profiles
aws sts get-caller-identity --profile lPankaj
Using a named profile ensures Terraform safely accesses AWS without affecting other accounts.
Step 1: Configure Terraform Backend
Terraform keeps track of infrastructure in a state file. By default, this file is stored locally, but that’s risky if you work in a team. Best practice is to use S3 for state storage and DynamoDB for state locking.
1.1 Create an S3 bucket
aws s3api create-bucket \
  --bucket myapp-terraform-state-bucket-s3 \
  --region ap-south-1 \
  --create-bucket-configuration LocationConstraint=ap-south-1 \
  --profile Pankaj
1.2 Enable versioning:
aws s3api put-bucket-versioning \
  --bucket myapp-terraform-state-bucket-s3 \
  --versioning-configuration Status=Enabled \
  --region ap-south-1 \
  --profile Pankaj
This ensures you can recover old Terraform state if something breaks.
1.3 Create a DynamoDB table
aws dynamodb create-table \
  --table-name myapp-terraform-state-locks \
  --attribute-definitions AttributeName=LockID,AttributeType=S \
  --key-schema AttributeName=LockID,KeyType=HASH \
  --billing-mode PAY_PER_REQUEST \
  --region ap-south-1 \
  --profile Pankaj
1.4 Configure backend in Terraform
In backend.tf:
# Creating a backend for terraform state management
terraform {
    backend "s3" {
        bucket = "myapp-terraform-state-bucket-s3"
        key   = "terraform/state"
        region = "ap-south-1"
        dynamodb_table = "myapp-terraform-state-locks"
        encrypt = true
    }
}
Step 2: Project Structure
Organizing your Terraform files properly is essential for readability, maintainability, and collaboration. We’ll split resources into logical .tf files.
Terraform
├── alb.tf --> ALB, listener, target group
├── auto-scaling.tf --> ECS autoscaling policies and alarms
├── backend.tf --> S3 + DynamoDB backend for remote state
├── ecr.tf --> ECR repository and lifecycle policy
├── ecs.tf --> ECS cluster, task definition, service
├── iam.tf --> IAM roles for ECS and autoscaling
├── logs.tf --> CloudWatch log group/stream
├── network.tf --> VPC, subnets, routing, NAT, IGW
├── provider.tf --> AWS provider config
├── security.tf --> Security groups for ALB and ECS tasks
├── variables.tf --> Actual values for variables
├── terraform.tfvars --> All required input variablesStep 3: Configure Provider & Input Variables
Terraform uses providers to interact with cloud platforms, like AWS. We’ll also define input variables to make our setup reusable and flexible across environments (staging, production, etc.).
3.1 Configure the AWS Provider
Create provider.tf:
provider "aws" {
  region  = var.aws_region
  profile = var.profile
}region: Specifies the AWS region where resources will be provisioned.profile: Uses the AWS CLI profile you configured earlier (Step 0).
Using variables here allows switching environments without editing code.
3.2 Define Input Variables
Create variables.tf:
variable "app_name" {
  description = "Name of the application"
}

variable "aws_region" {
  description = "value for AWS region"
}

variable "profile" {
  description = "value for AWS profile"
}

variable "ecs_task_role_name" {
  description = "Name of the ECS task role"
}

variable "ecs_task_execution_role_name" {
  description = "Name of the ECS task execution role"
}

variable "ecs_auto_scale_role_name" {
  description = "Name of the ECS auto scaling role"
}

variable "az_count" {
  description = "Number of availability zones to use"
}

variable "app_port" {
  description = "Port on which the application will run"
}

variable "app_count" {
  description = "Number of docker containers to run"
}

variable "health_check_path" {
  description = "Path for the health check"
}

variable "fargate_cpu" {
  description = "CPU units for the Fargate task"
}

variable "fargate_memory" {
  description = "Memory in MiB for the Fargate task"
}

variable "environment_name_one_key" {
  description = "Key for the first environment variable"
}

variable "environment_name_one_value" {
  description = "Value for the first environment variable"
}
Defining type and description improves clarity and enables validation.
3.3 Provide Actual Values
Create terraform.tfvars:
app_name = "myapp"
aws_region = "ap-south-1"
profile = "Pankaj"
ecs_task_role_name = "myEcsTaskRole"
ecs_task_execution_role_name = "myEcsTaskExecutionRole"
ecs_auto_scale_role_name = "myEcsAutoScaleRole"
az_count = 2
app_port = 8080
app_count = 2
health_check_path = "/"
fargate_cpu = 256
fargate_memory = 512
environment_name_one_key = "API_KEY"
environment_name_one_value = "dummyapikey"
Separating values from code makes it easier to reuse the same Terraform configuration across multiple environments.
Step 4: Networking
ECS tasks need a secure, highly available network setup. We’ll create a VPC, subnets, Internet Gateway, NAT Gateway, and route tables.
network.tf:
# Fetching AZs in the current region
data "aws_availability_zones" "available" {
}

# Creating vpc
resource "aws_vpc" "main" {
    cidr_block = "172.17.0.0/16"
    tags = {
        Name = "${var.app_name}-vpc"
    }
}

# Creating private subnet in each AZ
resource "aws_subnet" "private" {
    count  = var.az_count
    cidr_block = cidrsubnet(aws_vpc.main.cidr_block, 8, count.index)
    availability_zone = data.aws_availability_zones.available.names[count.index]
    vpc_id = aws_vpc.main.id
    tags = {
        name = "${var.app_name}-private-subnet-${count.index}"
    }
}

# Creating public subnet in each AZ
resource "aws_subnet" "public" {
    count = var.az_count
    cidr_block = cidrsubnet(aws_vpc.main.cidr_block, 8, count.index + var.az_count)
    availability_zone = data.aws_availability_zones.available.names[count.index]
    vpc_id = aws_vpc.main.id
    map_public_ip_on_launch = true
    tags = {
        name = "${var.app_name}-public-subnet-${count.index}"
    }
}

# Creating Internet Gateway for the public subnet
resource "aws_internet_gateway" "gw" {
    vpc_id = aws_vpc.main.id
    tags = {
        Name = "${var.app_name}-igw"
    }
}

# Creating route table for the public subnet
resource "aws_route" "internet_access"{
    route_table_id = aws_vpc.main.main_route_table_id
    destination_cidr_block = "0.0.0.0/0"
    gateway_id = aws_internet_gateway.gw.id
}

# Creating elastic IP for for NAT Gateway
resource "aws_eip" "gw" {
    count = var.az_count
    domain = "vpc"
    depends_on = [ aws_internet_gateway.gw ]
    tags = {
        Name = "${var.app_name}-nat-eip-${count.index}"
    }
}

# Creating NAT Gateway in the public subnet
resource "aws_nat_gateway" "gw" {
    count = var.az_count
    subnet_id = element(aws_subnet.public.*.id, count.index)
    allocation_id = element(aws_eip.gw.*.id, count.index)

    tags = {
        Name = "${var.app_name}-nat-gw-${count.index}"
    }
}

# Creating a route table for private subnet to route traffic through the NAT Gateway
resource "aws_route_table" "private" {
    count = var.az_count
    vpc_id = aws_vpc.main.id
    route {
        cidr_block = "0.0.0.0/0"
        nat_gateway_id = element(aws_nat_gateway.gw.*.id, count.index)
    }
    tags = {
        Name = "${var.app_name}-private-route-table-${count.index}"
    }
}

# Associate the route table to the private subnet
resource "aws_route_table_association" "private" {
    count = var.az_count
    subnet_id = element(aws_subnet.private.*.id, count.index)
    route_table_id = element(aws_route_table.private.*.id, count.index)
}
ECS tasks will run in private subnets for security. ALB will sit in public subnets.
Step 5: Security Groups
Security groups control inbound and outbound traffic. We’ll create separate groups for the ALB and ECS tasks to ensure secure communication.
The ALB allows HTTP traffic from the internet, while ECS tasks only accept traffic from the ALB.
security.tf:
# ALB security group
resource "aws_security_group" "lb" {
    name ="${var.app_name}-alb-sg"
    description = "Security group for the ALB"
    vpc_id = aws_vpc.main.id

    ingress {
        protocol = "tcp"
        from_port = 80
        to_port = 80
        cidr_blocks = ["0.0.0.0/0"]
        description = "Allow HTTP traffic from anywhere"
    }

    egress {
        protocol = "-1"
        from_port = 0
        to_port = 0
        cidr_blocks = ["0.0.0.0/0"]
        description = "Allow all outbound traffic"
    }
}

# ECS security group
resource "aws_security_group" "ecs_tasks" {
    name = "${var.app_name}-ecs-task-sg"
    description = "Security group for ECS tasks"
    vpc_id = aws_vpc.main.id

    ingress {
        protocol = "tcp"
        from_port = var.app_port
        to_port = var.app_port
        security_groups = [aws_security_group.lb.id]
        description = "Allow traffic from ALB to ECS tasks"
    }

    egress {
        protocol ="-1"
        from_port = 0
        to_port = 0
        cidr_blocks = ["0.0.0.0/0"]
        description = "Allow all outbound traffic"
    }
}
Our setup ensures minimal exposure of ECS tasks while keeping the ALB reachable from the public internet.
Step 6: Logging
To view container logs in CloudWatch:
logs.tf:
# Set up Cloudwatch group and log stream for the application logs
resource "aws_cloudwatch_log_group" "log_group" {
    name = "/ecs/${var.app_name}-log"
    retention_in_days = 30

    tags = {
        Name = "/ecs/${var.app_name}"
    }
}

# Set up cloudwatch log stream for the ECS service
resource "aws_cloudwatch_log_stream" "log_stream" {
    name = "${var.app_name}-stream"
    log_group_name = aws_cloudwatch_log_group.log_group.name
}
Our setup ensures we have a single, centralized location to monitor application logs without having to SSH into containers.
Step 7: IAM Roles
ECS tasks and services require IAM roles to securely interact with AWS resources. We’ll define three key roles:
- Execution Role → Allows ECS to pull images from ECR and push logs to CloudWatch.
- Task Role → Grants application-specific permissions (e.g., fetching secrets from SSM).
- Auto Scaling Role → Allows ECS to scale services automatically.
iam.tf:
# Data source to fetch the current AWS account ID
data "aws_caller_identity" "current" {}

# ECS task execution role
resource "aws_iam_role" "ecs_task_execution_role" {
  name = var.ecs_task_execution_role_name
  assume_role_policy = jsonencode({
    Version = "2012-10-17",
    Statement = [
      {
        Effect = "Allow",
        Principal = {
          Service = "ecs-tasks.amazonaws.com"
        },
        Action = "sts:AssumeRole",
        Sid = "ECSAssumeRole"
      }
    ]
  })
}

# ECS task role
resource "aws_iam_role" "ecs_task_role" {
    name = var.ecs_task_role_name
    assume_role_policy = jsonencode({
        Version = "2012-10-17",
        Statement = [
            {
                Effect = "Allow",
                Principal = {
                    Service = "ecs-tasks.amazonaws.com"
                },
                Action = "sts:AssumeRole",
                Sid = "ECSAssumeRole"
            }
        ]
    })
}

# Attach ECS task execution role policy
resource "aws_iam_role_policy_attachment" "ecs-task-execution-role-policy" {
    role       = aws_iam_role.ecs_task_execution_role.name
    policy_arn = "arn:aws:iam::aws:policy/service-role/AmazonECSTaskExecutionRolePolicy"
}

# Attach AmazonEC2ContainerRegistryReadOnly policy to ECS task execution role
resource "aws_iam_role_policy_attachment" "ecs-task-execution-role-ecr-access" {
    role       = aws_iam_role.ecs_task_execution_role.name
    policy_arn = "arn:aws:iam::aws:policy/AmazonEC2ContainerRegistryReadOnly"
}

# Create policy for ECS task to read variable from SSM parameter store
resource "aws_iam_policy" "ssm_policy" {
    name = "${var.app_name}-ssm-policy"
    policy = jsonencode({
        Version = "2012-10-17",
        Statement = [
            {
                Effect = "Allow",
                Action = [
                    "ssm:GetParameter",
                    "ssm:GetParameters"
                ],
                Resource = [
                    "arn:aws:ssm:${var.aws_region}:${data.aws_caller_identity.current.account_id}:parameter/${var.app_name}/${var.environment_name_one_key}"
                ]
            }
        ]
    })
}

# Attach the SSM policy to the ECS task role
resource "aws_iam_role_policy_attachment" "ecs-task-role-ssm-policy-attachment" {
    role       = aws_iam_role.ecs_task_execution_role.name
    policy_arn = aws_iam_policy.ssm_policy.arn
}

# Data source to create a policy statement for ECS auto scale rule
# This role will allow ECS to manage auto scaling for the service
data "aws_iam_policy_document" "ecs_auto_scale_role" {
    version = "2012-10-17"
    statement {
        effect = "Allow"
        actions = ["sts:AssumeRole"]

        principals {
            type = "Service"
            identifiers = ["application-autoscaling.amazonaws.com"]
        }
    }
}

# ECS auto scale role
resource "aws_iam_role" "ecs_auto_scale_role" {
    name = var.ecs_auto_scale_role_name
    assume_role_policy = data.aws_iam_policy_document.ecs_auto_scale_role.json
}
Our setup enforces the principle of least privilege, ensuring each role has only the permissions required.
Step 8: ECR Repository
We need a private Elastic Container Registry (ECR) to store and manage Docker images for our application.
This allows ECS tasks to pull container images directly from AWS-managed storage.
ecr.tf:
# Create a ECR repository for the application
resource "aws_ecr_repository" "app_repo" {
    name = "${var.app_name}-repo"
    image_tag_mutability = "IMMUTABLE"
    image_scanning_configuration {
      scan_on_push = true
    }
}

# Create a lifecycle policy for the ECR repository
resource "aws_ecr_lifecycle_policy" "app_repo_policy" {
  repository = aws_ecr_repository.app_repo.name

  # Policy to keep the last 3 images and expire the rest
  policy = jsonencode({
    rules = [
      {
        rulePriority = 1
        description = "Keep last 3 images"
        selection = {
          tagStatus = "any"
          countType = "imageCountMoreThan"
          countNumber = 3
        }
        action = {
          type = "expire"
        }
      }
    ]
  })
}
Notes
- ECR Repository: Stores Docker images securely within AWS.
- Immutability: Prevents overwriting existing tags.
- Image Scanning: Automatically scans pushed images for vulnerabilities.
- Lifecycle Policy: Keeps the last 3 images to optimize storage costs.
With this in place, we can build Docker images locally, push them to ECR, and ECS will pull them securely during deployments.
Step 9: ECS Cluster, Task, and Service
Now we bring everything together — the ECS cluster, task definition, and service.
This is where our Dockerized app actually runs on Fargate inside private subnets, connected securely to the ALB.
ecs.tf:
# Create secure parameter in SSM Parameter Store
resource "aws_ssm_parameter" "environment_name_one" {
    name = "/${var.app_name}/${var.environment_name_one_key}"
    type = "SecureString"
    value = var.environment_name_one_value
    overwrite = false
    description = "Secure parameter for ${var.environment_name_one_key} in ${var.app_name} application"
    lifecycle {
      prevent_destroy = false
    }
}

# Create ECS cluster
resource "aws_ecs_cluster" "main" {
    name = "${var.app_name}-cluster"
}

# Create task definition
resource "aws_ecs_task_definition" "app" {
    family                  = "${var.app_name}-task"
    execution_role_arn       = aws_iam_role.ecs_task_execution_role.arn
    network_mode             = "awsvpc"
    requires_compatibilities = ["FARGATE"]
    cpu                      = var.fargate_cpu
    memory                   = var.fargate_memory
    task_role_arn            = aws_iam_role.ecs_task_role.arn
    container_definitions = jsonencode(
        [
            {
                name      = "${var.app_name}-container"
                image     = "${aws_ecr_repository.app_repo.repository_url}:latest"
                cpu       = var.fargate_cpu
                memory    = var.fargate_memory
                portMappings = [
                    {
                        containerPort = var.app_port
                        hostPort      = var.app_port
                        protocol      = "tcp"
                    }
                ]
                environment = [
                    {
                        name  = "PORT"
                        value = tostring(var.app_port)
                    }
                ]
                secrets = [
                    {
                        name      = var.environment_name_one_key
                        valueFrom = aws_ssm_parameter.environment_name_one.arn
                    }
                ]
                logConfiguration = {
                    logDriver = "awslogs"
                    options   = {
                        "awslogs-group"         = "/ecs/${var.app_name}-log"
                        "awslogs-region"        = var.aws_region
                        "awslogs-stream-prefix" = "ecs"
                    }
                }
            }
        ]
    )
}

# Create ECS service
resource "aws_ecs_service" "main" {
    name = "${var.app_name}-service"
    cluster = aws_ecs_cluster.main.id
    task_definition = aws_ecs_task_definition.app.arn
    desired_count = var.app_count
    launch_type = "FARGATE"

    network_configuration {
      security_groups = [aws_security_group.ecs_tasks.id]
      subnets = aws_subnet.private.*.id
      assign_public_ip = false
    }

    # Load Balancer
    load_balancer {
        target_group_arn = aws_alb_target_group.app.id
        container_name = "${var.app_name}-container"
        container_port = var.app_port
    }

    depends_on = [ aws_alb_listener.front_end, aws_iam_role_policy_attachment.ecs-task-execution-role-policy ]
}
Notes
- SSM Parameter Store: Stores sensitive values securely and injects them into ECS tasks.
- ECS Cluster: Logical grouping for ECS services and tasks.
- Task Definition: Blueprint for how containers run (CPU, memory, image, ports, env vars, logs).
- ECS Service: Runs tasks on Fargate, integrates with ALB for traffic routing, and manages scaling.
- Private Subnets: Tasks run securely without public IPs; only ALB can reach them.
At this stage, our application is ready to run in a secure, scalable Fargate environment behind an ALB.
Step 10: Application Load Balancer
The Application Load Balancer distributes incoming traffic across our ECS tasks running in private subnets.
Our ALB listens on port 80 and forwards requests to the ECS service through a target group.
alb.tf:
# Creating appication load bakancer
resource "aws_alb" "main" {
    name = "${var.app_name}-alb"
    subnets = aws_subnet.public.*.id
    security_groups = [aws_security_group.lb.id]
}

# Creating a target group
resource "aws_alb_target_group" "app" {
    name = "${var.app_name}-tg"
    port = var.app_port
    protocol = "HTTP"
    vpc_id = aws_vpc.main.id
    target_type = "ip" # IP target type for Fargate tasks

    health_check {
        healthy_threshold = "3"
        port = var.app_port
        interval = "30"
        protocol = "HTTP"
        matcher = "200"
        timeout = "3"
        path = var.health_check_path
        unhealthy_threshold = "3"
    }
}

# Creating a listener for the ALB
resource "aws_alb_listener" "front_end" {
    load_balancer_arn = aws_alb.main.arn
    port = 80
    protocol = "HTTP"

    default_action {
        type = "forward"
        target_group_arn = aws_alb_target_group.app.id
    }
}
Notes
- ALB: Created in public subnets so it’s internet-facing.
- Target Group: ECS tasks are registered here via their private IPs.
- Health Check: Ensures only healthy containers receive traffic.
- Listener: Listens on port 80 and forwards traffic to the target group.
With this ALB in place, our application can securely receive and route traffic from the internet into private ECS tasks.
Step 11: Auto Scaling
To handle varying traffic, we enable auto scaling for our ECS service.
Our service will scale in and out based on average CPU utilization, ensuring cost efficiency and performance.
auto-scaling.tf:
# Create target group for the ECS service

resource "aws_appautoscaling_target" "target" {
    service_namespace = "ecs"
    resource_id = "service/${aws_ecs_cluster.main.name}/${aws_ecs_service.main.name}"
    scalable_dimension = "ecs:service:DesiredCount"
    role_arn = aws_iam_role.ecs_auto_scale_role.arn
    min_capacity = 2
    max_capacity = 4
}

# Automatically scale capacity up by one
resource "aws_appautoscaling_policy" "up" {
    name = "${var.app_name}_scale_up"
    service_namespace = "ecs"
    resource_id = "service/${aws_ecs_cluster.main.name}/${aws_ecs_service.main.name}"
    scalable_dimension = "ecs:service:DesiredCount"

    step_scaling_policy_configuration {
        adjustment_type = "ChangeInCapacity"
        cooldown = 60
        metric_aggregation_type = "Maximum"
        step_adjustment {
            scaling_adjustment = 1
            metric_interval_lower_bound = 0
        }
    }
    depends_on = [aws_appautoscaling_target.target]
}

# Automatically scale capacity down by one
resource "aws_appautoscaling_policy" "down" {
    name = "${var.app_name}_scale_down"
    service_namespace = "ecs"
    resource_id = "service/${aws_ecs_cluster.main.name}/${aws_ecs_service.main.name}"
    scalable_dimension = "ecs:service:DesiredCount"

    step_scaling_policy_configuration {
        adjustment_type = "ChangeInCapacity"
        cooldown = 60
        metric_aggregation_type = "Maximum"
        step_adjustment {
            scaling_adjustment = -1
            metric_interval_upper_bound = 0
        }
    }

    depends_on = [ aws_appautoscaling_target.target ]
}

# CloudWatch alarm that triggers scale up policy
resource "aws_cloudwatch_metric_alarm" "service_cpu_high" {
    alarm_name = "${var.app_name}_cpu_utilixation_high"
    comparison_operator = "GreaterThanOrEqualToThreshold"
    evaluation_periods = "2"
    metric_name = "CPUUtilization"
    namespace = "AWS/ECS"
    period = "60"
    statistic = "Average"
    threshold = "75"

    alarm_actions = [aws_appautoscaling_policy.up.arn]
    dimensions = {
        ClusterName = aws_ecs_cluster.main.name
        ServiceName = aws_ecs_service.main.name
    }
}

# CloudWatch alarm that triggers scale down policy
resource "aws_cloudwatch_metric_alarm" "service_cpu_low" {
    alarm_name = "${var.app_name}_cpu_utilixation_low"
    comparison_operator = "LessThanOrEqualToThreshold"
    evaluation_periods = "2"
    metric_name = "CPUUtilization"
    namespace = "AWS/ECS"
    period = "60"
    statistic = "Average"
    threshold = "25"

    alarm_actions = [aws_appautoscaling_policy.down.arn]
    dimensions = {
        ClusterName = aws_ecs_cluster.main.name
        ServiceName = aws_ecs_service.main.name
    }
}
Notes
- Target: Defines our ECS service as scalable with min 1 task and max 4 tasks.
- Scaling Policy: Uses Target Tracking to keep average CPU around 50%.
- Cooldowns: Prevents scaling too frequently by enforcing 60s between adjustments.
Our service now scales automatically based on load, ensuring high availability without over-provisioning.
Step 12: Deploy Terraform
Now that our Terraform code is complete, it’s time to deploy the infrastructure.
We’ll initialize Terraform, validate the configuration, review the execution plan, and then apply it to provision our AWS ECS setup.
# Initialize Terraform (downloads providers & sets up backend)
terraform init

# Validate configuration
terraform validate

# Preview the changes
terraform plan -var-file="terraform.tfvars"

# Apply the changes (creates infrastructure)
terraform apply -var-file="terraform.tfvars" -auto-approve
Notes
- terraform init → Prepares the working directory by downloading provider plugins and configuring the remote backend.
- terraform validate → Checks for syntax errors and ensures the configuration is valid.
- terraform plan → Shows a preview of resources that will be created, updated, or destroyed.
- terraform apply → Provisions the infrastructure on AWS.
At this stage, ECS service may start but won’t run containers properly because no image exists in ECR yet. We’ll push the Docker image in the next step.
Step 13: Push Docker Image to ECR
Before our ECS service can run, we need to push a Docker image to Amazon ECR (Elastic Container Registry). ECS tasks will then pull this image during deployment.
We’ll authenticate Docker with ECR, build the image locally, push it to the repository, and finally trigger a new ECS deployment.
# Authenticate Docker with ECR
aws ecr get-login-password --region ap-south-1 --profile Pankaj \
  | docker login --username AWS --password-stdin <account_id>.dkr.ecr.ap-south-1.amazonaws.com

# Build and push image
docker build -t myapp .
docker tag myapp:latest <account_id>.dkr.ecr.ap-south-1.amazonaws.com/myapp-repo:latest
docker push <account_id>.dkr.ecr.ap-south-1.amazonaws.com/myapp-repo:latest
Then force ECS to redeploy:
aws ecs update-service \
  --cluster myapp-cluster \
  --service myapp-service \
  --force-new-deployment \
  --region ap-south-1 \
  --profile Pankaj
Notes
- ECR Login → Uses AWS CLI to authenticate Docker to ECR.
- docker build → Builds the application image from the Dockerfile.
- docker tag → Tags the image with the ECR repo URL.
- docker push → Uploads the image to ECR so ECS can use it.
- ecs update-service — force-new-deployment → Ensures ECS fetches the latest container image.
With the image now in ECR, ECS Fargate tasks can start running our application successfully.
Step 14: Verify
With the infrastructure deployed and the Docker image pushed, it’s time to verify that everything is working as expected.
We’ll locate the Application Load Balancer (ALB) DNS name and test our application in the browser.
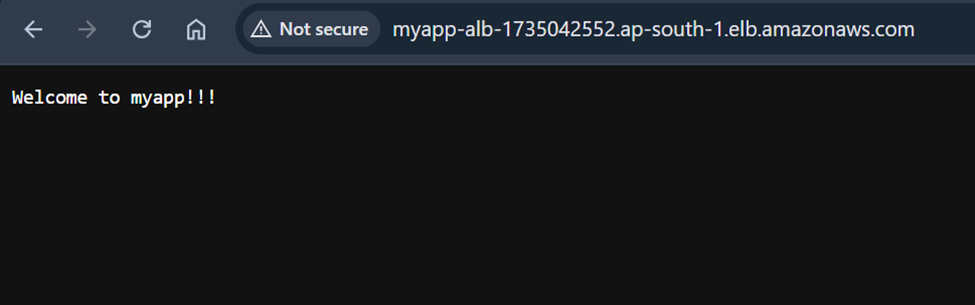
Congratulations, our application is now live.🎉

Next Steps:
- Automated Deployment Pipelines: Set up CI/CD with CodePipeline, GitHub Actions, or Jenkins to deploy updates automatically and reliably.
- Secure Traffic: Use an ACM certificate to serve all traffic over TLS/SSL, keeping data encrypted end-to-end.
- Secrets Management: Store sensitive values in AWS Secrets Manager for centralized, secure, and rotating credentials.
- Monitoring & Observability: Use CloudWatch dashboards, logs, and alarms to track ECS task health and application performance.
Conclusion
Setting up ECS with Terraform might sound tricky at first, but once everything is running, it just works. Tasks run smoothly, traffic flows through the ALB, and logs are easy to check in CloudWatch. The best part? You can replicate this setup anytime without endless clicks in the console.
This gives you a solid, repeatable foundation that’s secure and scalable. You can focus on building your app while keeping infrastructure reliable and stress-free.
I hope you found this content informative and enjoyable. For more insightful blogs and updates, consider following and clicking the 👏 button below to show your support. Happy coding! 🚀
Thank you for reading! 💚
